

Available on all Cloud plans; Self-Hosted requires Business or higher.
Overview
The App Builder follows a “Prompt to App” workflow. You describe what you want, and AI builds the application structure, pages, and logic for you. You can then fine-tune every detail using the visual editor or code.Use App Builder to create custom interfaces and standalone apps. For interactive data analysis and ad-hoc questions inside the project, use AI Chat.
Creating an App
There are two main ways to create an app:- From Project: In any Project, click “Create App” to generate an application linked to your current data.
- From Chat: Open AI Chat and say “Create a CRM app for this customer table”.
The App Editor Interface
The App Builder provides a dual-interface for both non-technical users and developers.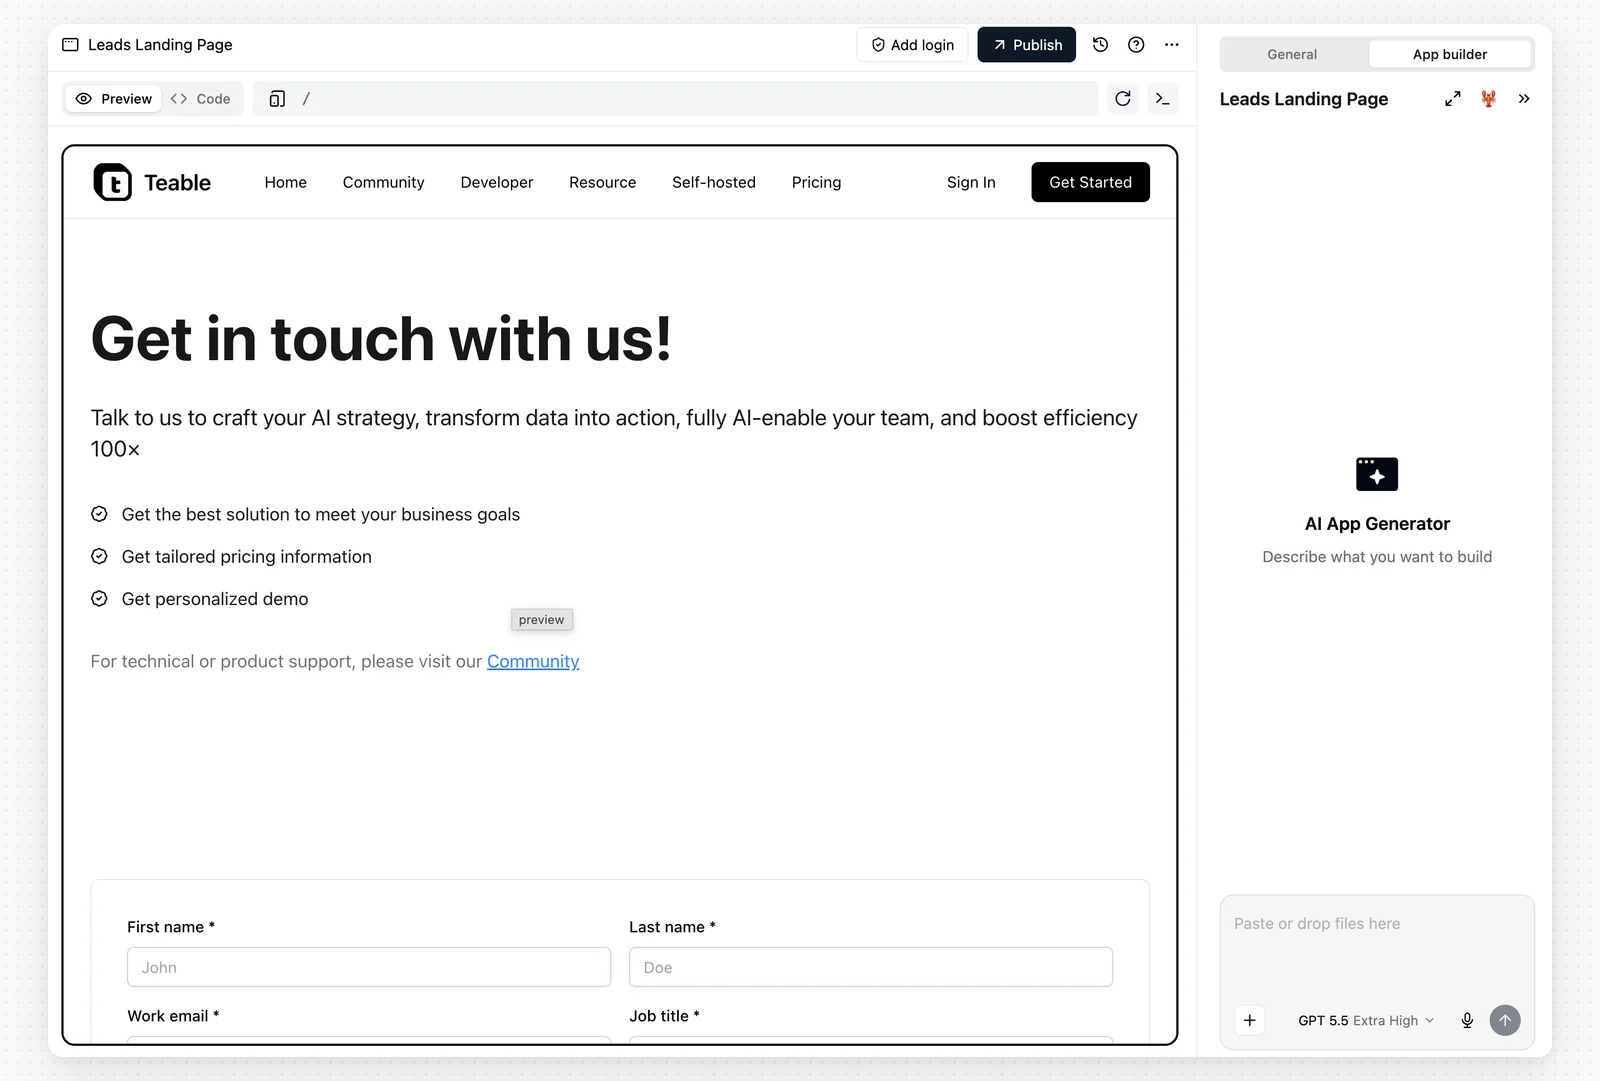
1. Chat Interface (AI-Driven)
The command center for your app.- Natural Language Editing: Describe changes like “Make the header blue” or “Add a submission form for new records”.
- Auto-Routing: The AI understands which component or page you are referring to and modifies it directly.
- Credential requests: When the app needs access to a third-party account or a secret at run time, App Builder pins a card to the chat panel, such as This app needs your Slack connection. Click Connect my account to run an OAuth flow; the new connection is granted to this app right away. If you already have a usable connection or secret, just grant it; there is no need to connect again. Click Skip to withhold the credential; AI continues with the parts it can complete without it.
- Skills: Open the + menu and choose Skills to manage skills for this app conversation. A skill added here is only available to the current app, and the skills shared with the app’s project and space can be used here as well. Type
/in the input box to choose an enabled skill. - Manage files: Open + → More → Manage files to view files in the app sandbox. Use it to preview supported files, download generated files, or delete files and folders you no longer need.
- Clear Conversation: If the current conversation has drifted, click Clear Chat in the bottom-right corner of the panel to start a new session. This clears the chat history for the current conversation but does not delete the app itself. The first use shows a confirmation, and you can choose not to show it again next time.
2. Preview Panel
- Preview and Live: The panel has two tabs. Preview runs the version you are building, including changes that are not published yet. Live loads the published app from its public address, so you can compare what your users see with what you are working on. Until the app is published, Live shows a publish prompt instead. App Builder opens a published app on Live and an unpublished one on Preview, and afterwards remembers the tab you last used for that app.
- Multi-Device Simulation: Use the switcher at the top to toggle Desktop, Tablet, and Mobile views.
- Live Generation: The preview panel can show the app taking shape while App Builder is generating.
- Instant Feedback: After App Builder finishes a change, the preview refreshes with the latest saved version.
- Choose Select an element to edit, then click an element in the preview. App Builder adds the element to the chat input. Add your instruction and send the message so AI can update that specific part of the app.
- Choose Edit text directly, then click static text in the preview and type your replacement. You can edit more than one text element before clicking Save. Click Discard edits to undo the pending text changes.
Esc to exit either mode.
3. Developer Mode (Code Editor)
For infinite customization, you have direct access to the code.- Monaco Editor: A VS Code-like experience right in the browser.
- React Components: Edit the underlying React code, Tailwind CSS classes, and logic.
- File Tree: Navigate through the project structure.
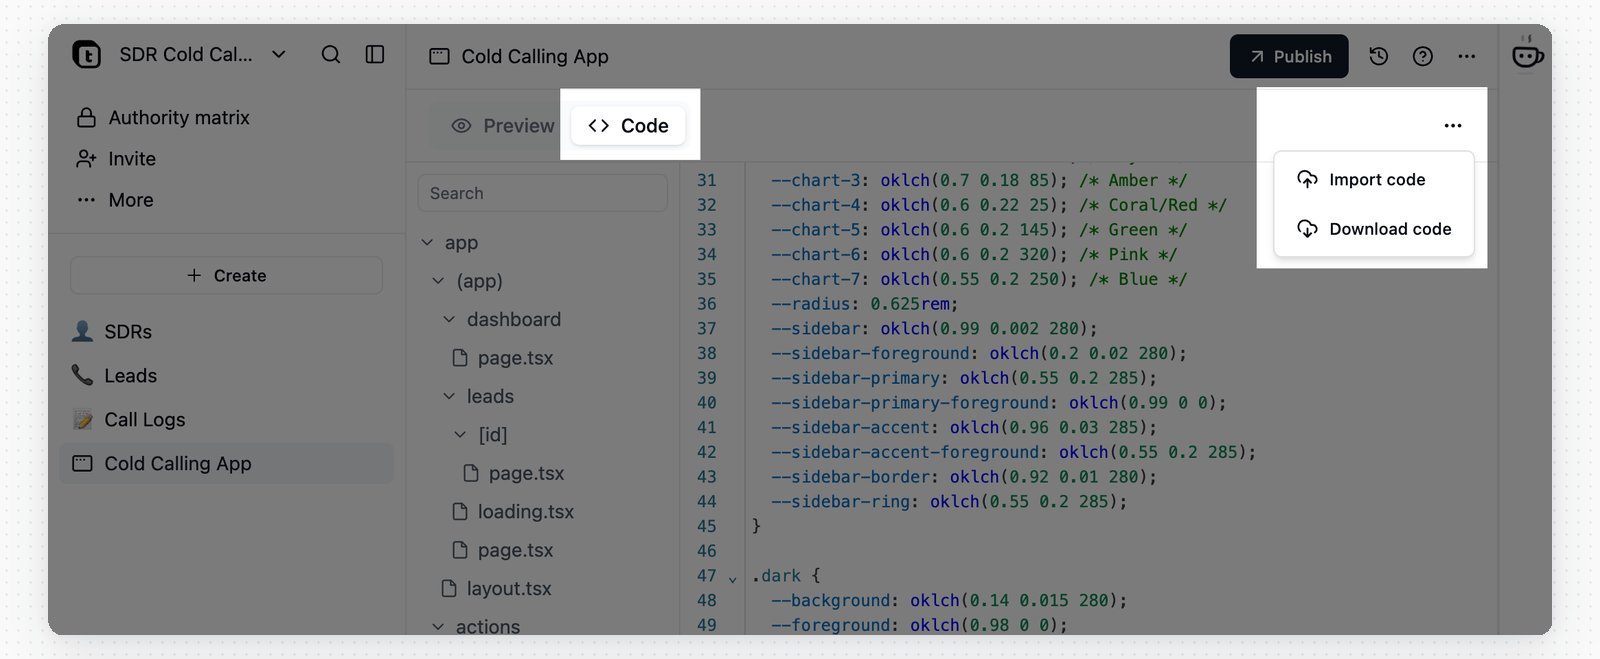
Download Code
You can download the entire app as a ZIP archive at any time:- Switch to the Code tab in the editor.
- Click the
...menu in the tab bar. - Select Download code to save a ZIP archive that includes all source files.
.env file with the platform-injected runtime variables only, including the access token; credentials granted to the app are not part of it. Review the contents before sharing the ZIP.
Import Code
You can update the app’s code by importing a ZIP:- Switch to the Code tab in the editor.
- Click the
...menu in the tab bar. - Select Import code and choose a ZIP file up to 20 MB.
- Include source files only.
node_modules,.next, and other build artifacts are ignored automatically. - The ZIP replaces the existing project. Files you leave out are removed from the new version.
- If the ZIP contains one wrapper folder, Teable strips that folder. You can compress the outermost project folder directly.
- The imported project must include
package.jsonat the project root. - Custom variables in a root
.envfile are stored as your secrets and granted to the app under the same names. Other.env*variants, such as.env.local, are ignored.
Credentials and Config
Keep API keys, credentials, and configuration out of your source. An app uses your credentials: an OAuth connection or a secret you store. In the App Builder chat panel, open + → More → Credentials & config and grant a credential to the app.
After you add a grant, remove one, or replace a credential value, the app preview environment uses the new value. The published app uses it only after you republish.
Copying an app does not copy its credentials: the panel keeps Not bound yet placeholders, and Bind mine supplies your own. See Credentials and Integrations for managing credentials and checking where they are used.
Manage App Files
App Builder stores uploaded files, generated outputs, and runtime files in the app sandbox. In the chat panel, open + → More → Manage files to inspect them. Supported file types open in preview. You can also download files or delete files and folders you no longer need.Add AI Features to an App
Add AI when your app needs to summarize records, classify requests, draft replies, or answer questions for app users. You can tell App Builder what you want, such as: “Add an AI reply assistant for support tickets” or “Summarize each form submission.” App Builder can turn on AI access and add the code for the feature.After App Builder adds the AI feature, the app preview uses the new version. The published app uses it only after you republish.
Sync Code with GitHub
Available on Cloud Business plans and above.
Connect an Account and Create the Repository
Generate the app at least once first. Until the app has code, the GitHub button shows Generate the app first to connect GitHub and does nothing.1
Open the GitHub panel
Click the GitHub icon in the app header to open GitHub sync. You need edit access to the app.
2
Connect an account
Click Connect GitHub and complete the installation in the popup window. Choose your personal account or an organization you administer. Allow popups if your browser blocks the window.
3
Pick the account
Select the connected account under GitHub account. Click + to connect another one.
4
Name the repository
Repository name is prefilled from the app name. Names may contain letters, digits,
., -, and _, up to 100 characters.5
Create and link
Click Create repository & link. For a personal account, GitHub asks you to authorize the creation in one more popup.
main branch, along with a README that points back to the app and explains how the two stay in sync. You cannot link an app to a repository that already exists.
By default a connection belongs to whoever created it. To let collaborators build on the same organization account, select the connection and turn on Allow other members to use this connection. Other members with app editing access can then create repositories for their own apps under that organization. Personal connections cannot be shared, because GitHub requires the account owner’s own authorization to create a repository.
How Syncing Works
Environment files are never pushed. See Environment Variables and Local Development below.
The panel shows the current state next to the repository name:
Resolve a Conflict
Teable never force-pushes your branch. When the histories diverge, it parks the latest app version on a branch namedteable-sync and marks the link Conflict. Merge teable-sync into main on GitHub; the merge comes back as a new app version and the link returns to Synced. While the conflict lasts, later app versions keep moving the teable-sync branch forward, so merging it always brings in the newest work.
Environment Variables and Local Development
The repository holds source only. Teable never pushes a file whose name starts with.env: not at the project root, not in a subfolder, and not in the commit history. Environment values come from the credentials granted to the app, live in Credentials & config, and never enter git. The repository’s .gitignore already lists .env*, so a local clone will not commit one by accident.
To run the app on your own machine:
1
Clone and install
Clone the repository and run
pnpm install.2
Copy the variables
In the GitHub panel, click Copy local env variables, then paste the clipboard into a
.env file at the project root.3
Start the app
Run
pnpm dev..env to GitHub has no effect. After a platform variable changes, such as a regenerated access token, copy the variables again to refresh your local .env.
Unlink the Repository
Click the delete icon next to the repository name and confirm. Syncing stops, and the repository and its code stay on GitHub. Linking the same app again later creates a new repository rather than reconnecting to the old one.Publishing & Management
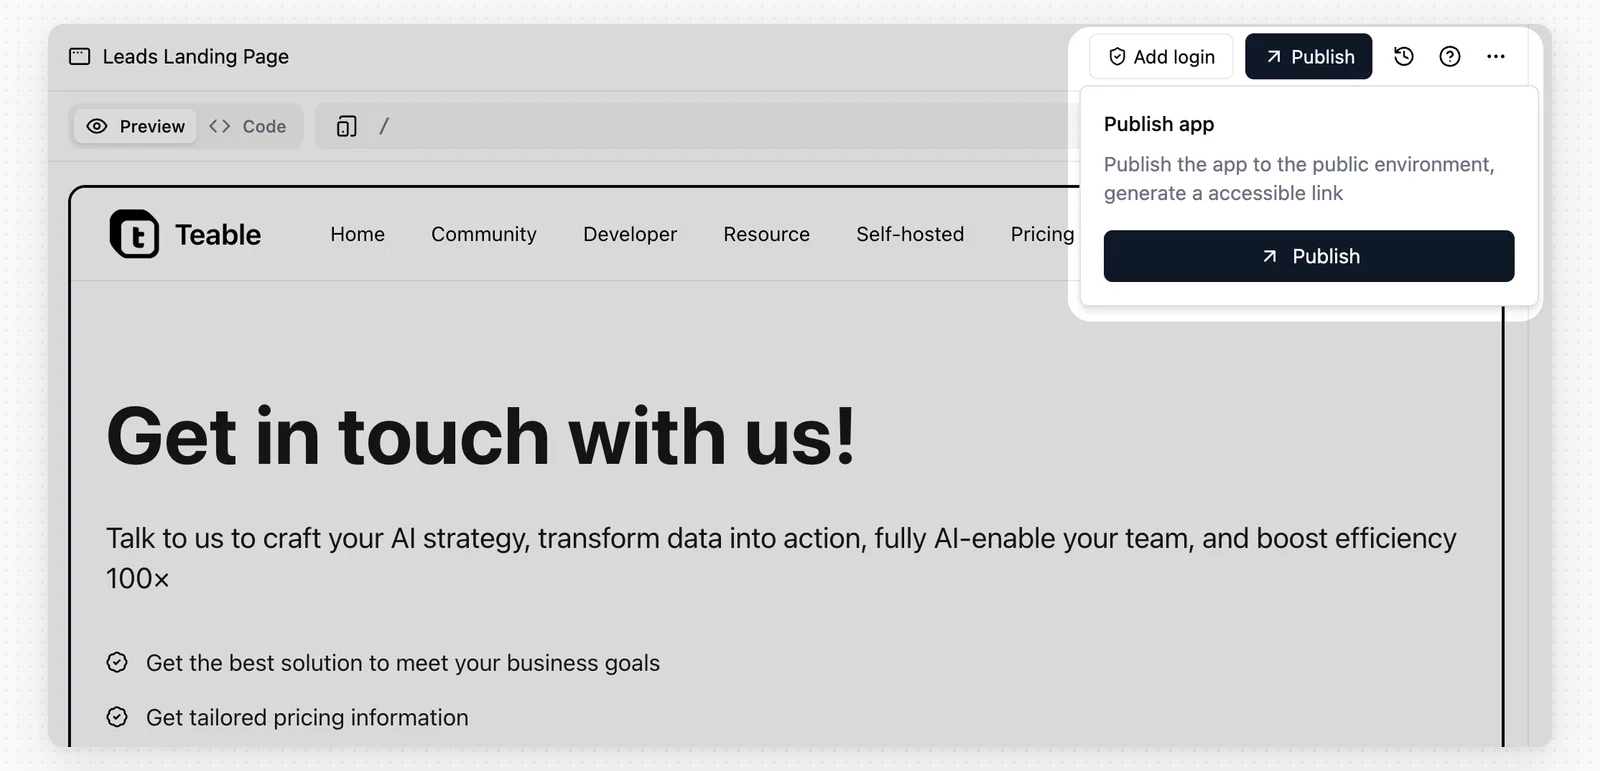
Publishing Your App
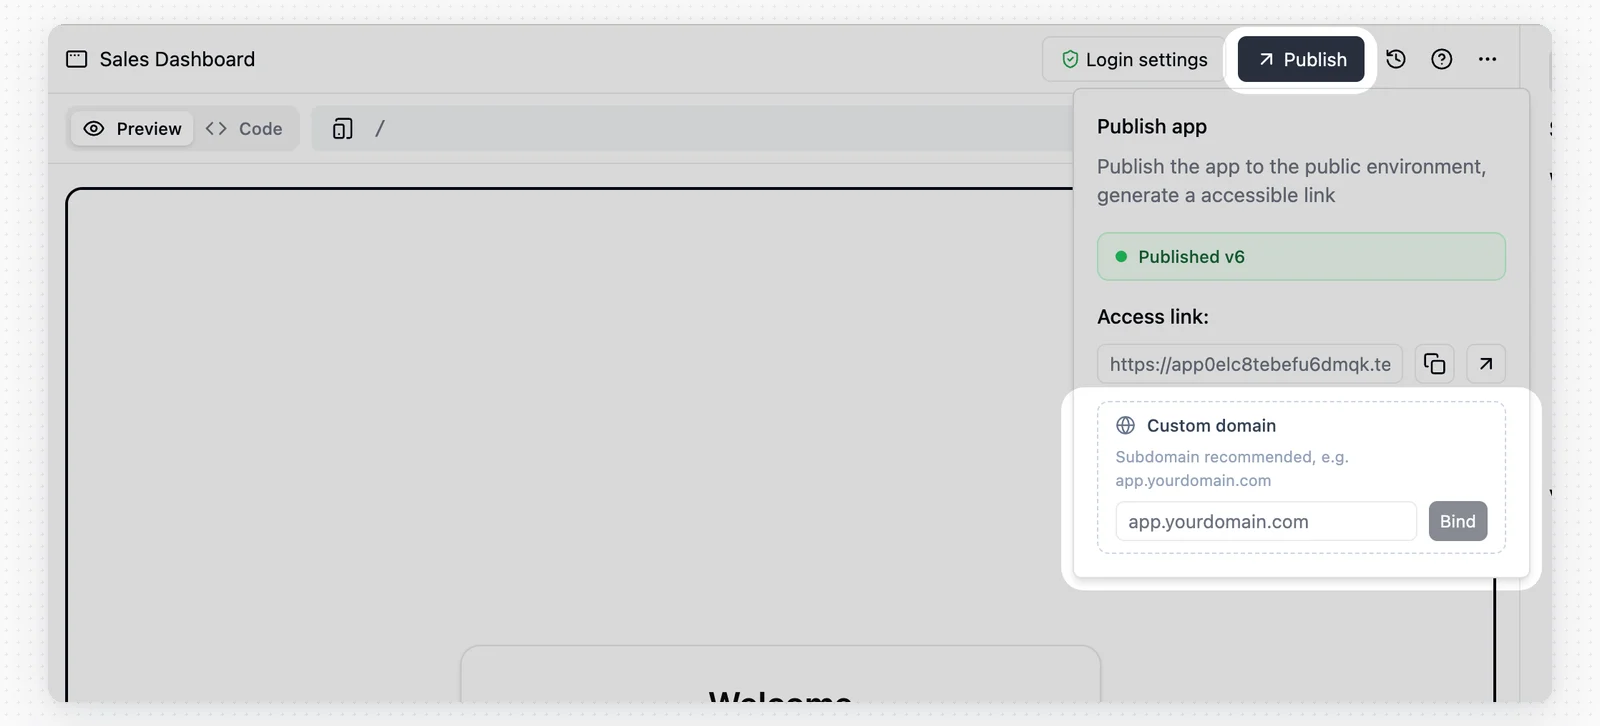
When your app is ready, click the Publish button (arrow icon) in the top right corner.- Public URL: Teable generates a secure, publicly accessible URL for your app.
- Custom Domain: Map your own domain to the app.
- Show branding: Use Show branding in the Publish menu to control whether the published app shows the Build with Teable badge. If you change this setting after publishing, click Redeploy to apply it.
- Unpublish: For a published app, use Unpublish in the publish menu to take the public link offline.
- App configuration changes: When the publish menu shows Runtime configuration changed. Redeploy to apply it to the live app or Branding setting changed. Redeploy to apply it to the live app, click Redeploy.
- Open published app: Once an app is published, the icon next to Publish opens the live app in a new tab.
Hiding the Build with Teable badge requires the Business plan or above.
Unpublish an App
To take a published app offline, open the Publish menu and click Unpublish. After you confirm, the public app URL can no longer be accessed.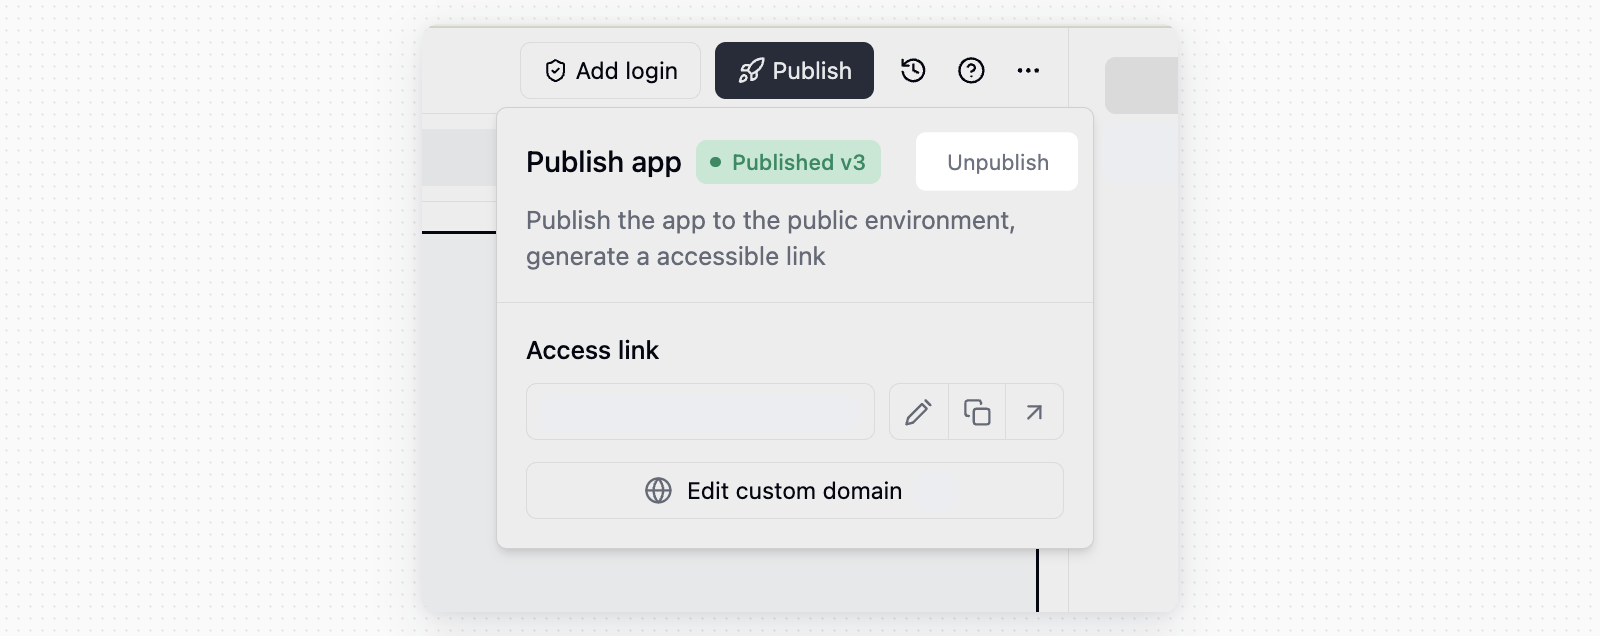
Custom Domains
Custom domains require the Business plan or above.
app.yourdomain.com. After you enter the domain, Teable shows the DNS records to add. Add the records with your DNS provider, wait for propagation, then verify the domain in Teable.
You can also use an available subdomain under teable.app and edit the teable.app prefix, such as your-name.teable.app.
When the space’s Business plan expires, Teable notifies the space owners that the custom domain will stop resolving. Renew before then to keep the domain. If the plan isn’t renewed, the custom domain stops resolving and the app’s public link reverts to the default Teable address. If you upgrade to Business again later, you need to bind the custom domain again manually.
Custom Site Info
Use Custom site info in the Publish menu to set the browser tab icon, page title, and description of the published app. The dialog previews how they look together as you edit.
Leave a field empty to keep the value App Builder wrote for you. Saving applies the change to the app preview environment; the published app uses it only after you republish.
App Login
Click Add login in the app header to require visitors to sign in before they can use the app. Once login is configured, the button changes to Login settings.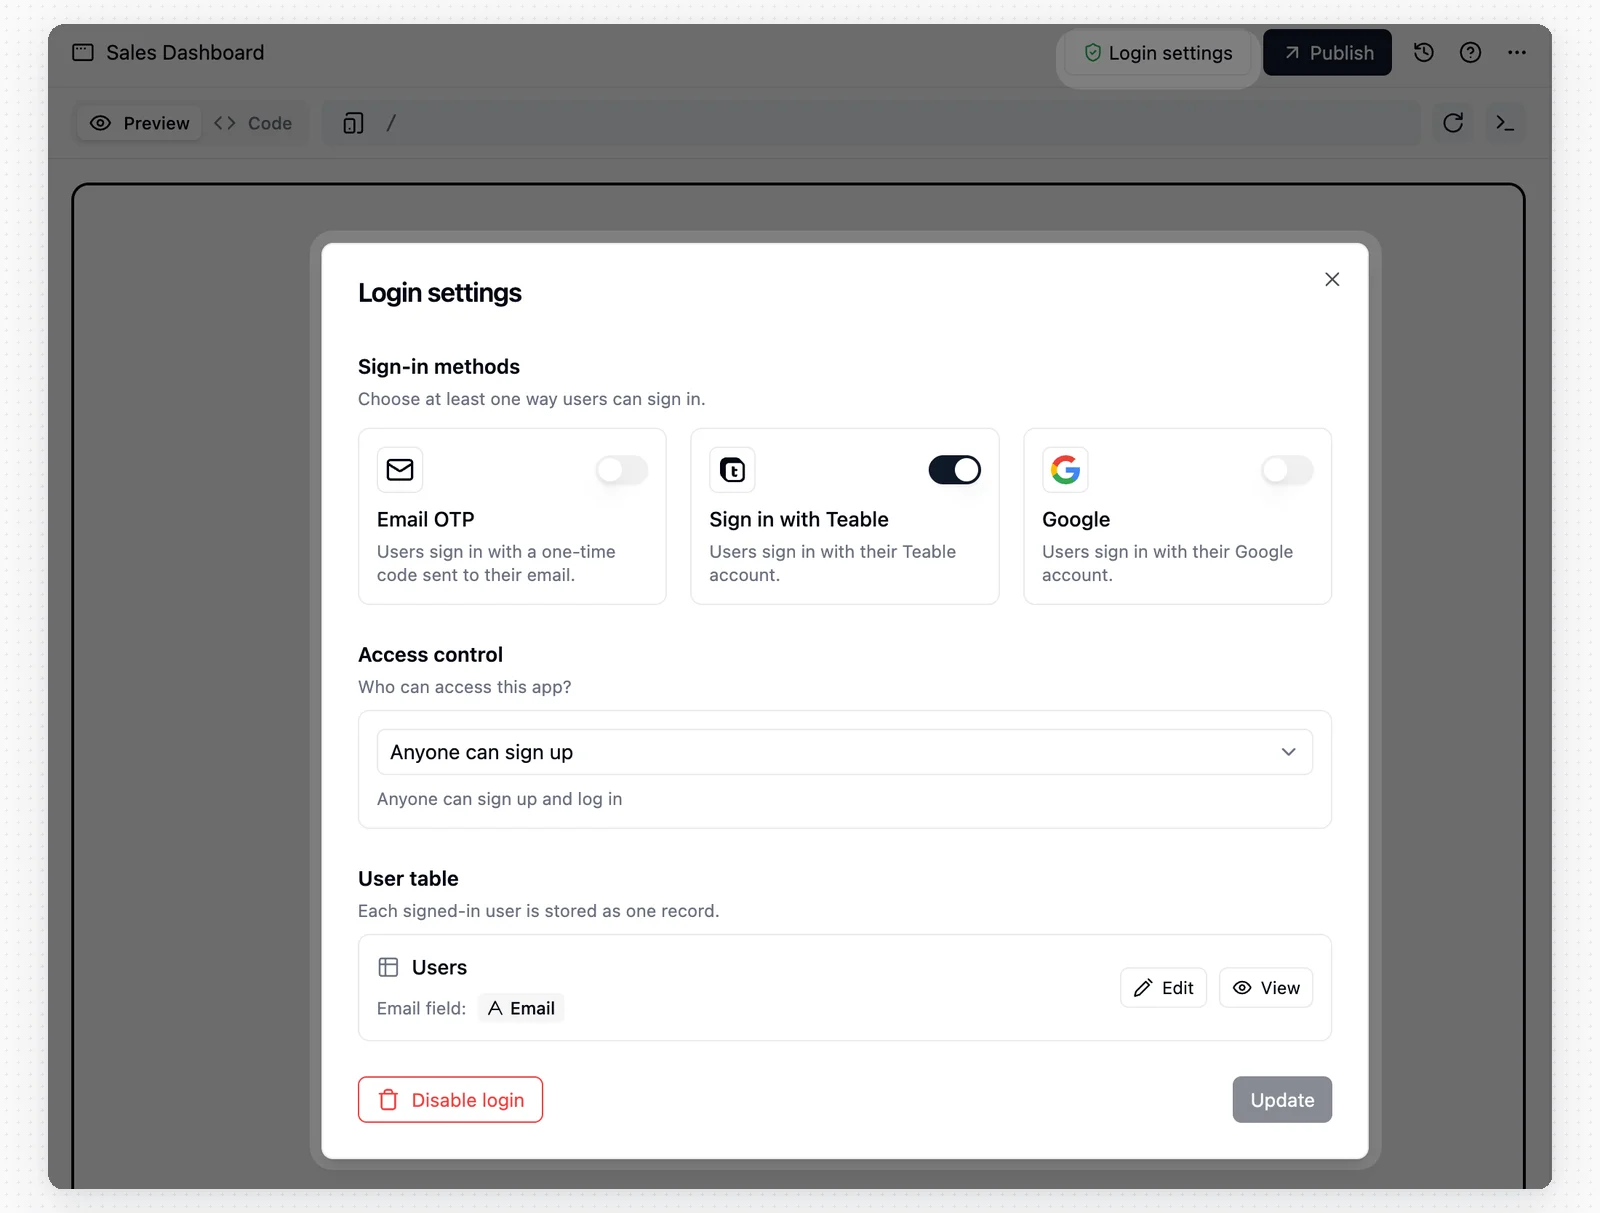
- Choose where to store app users. You can create a Users table or reuse an existing table with an email field. Each signed-in user is stored as one record, and the same user table can be reused by multiple apps.
- Choose at least one sign-in method, such as Email OTP, Google, or Teable. Available methods depend on your instance’s authentication settings.
- Choose an access policy: Anyone can sign up, Allowed email domains, or Invite only.
Version History & Rollback
Teable automatically tracks every deployment.- Click the History (clock icon) button to view a list of all deployed versions.
- One-Click Rollback: If a new update causes issues, you can instantly revert the live app to any previous stable version.

- Version save failed: this version was not saved. Let App Builder keep working, and the next successful save carries these changes along.
- Changes too large to save: this round exceeds the save size limit. Click Send to AI on the card and App Builder looks for oversized test artifacts, debug files, or attachments, cleans them up, and saves again. Such files may already be in the unsaved commit history, so deleting them may not be enough; let App Builder tidy that up as well.
Auto-fix
If your custom code changes cause a build error, the deployment will fail.- Teable provides an Auto-fix button alongside the error log.
- Clicking this lets AI analyze the compilation error and automatically patch the code to resolve the issue.
Deleting an App
To delete an app, click the Settings (gear icon) button in the header and select Delete.Best Practices
For prompt patterns, build tips, rollback advice, and common troubleshooting, see App Builder Practical Guide.FAQ
Does clearing the conversation delete the app?
Does clearing the conversation delete the app?
No. Clearing the conversation only removes the chat history for the current app conversation. It does not delete the app itself. Use it when the conversation has drifted and you want to start again.
How do I download or import app code?
How do I download or import app code?
Switch to the Code tab in the editor, click the
... menu in the tab bar, then choose Download code or Import code. Imported ZIP files can be up to 20 MB and replace the existing project, so include every source file you want to keep. The imported project must include a root package.json. Custom variables in a root .env file are stored as your secrets and granted to the app under the same names.When do login settings apply to the live app?
When do login settings apply to the live app?
Login settings appear in the app preview environment after it reloads. Publish the app again to apply those changes to the published app.
How can an app call AI models at runtime?
How can an app call AI models at runtime?
Tell App Builder what AI feature you want, such as a reply assistant, submission summary, or request classifier. App Builder can enable AI access and add the code for the feature. The app preview uses the new version after App Builder finishes the change. The published app uses it only after you republish. AI calls made through this app appear as App AI in the credit usage details.
How are Built-in AI and In-app AI charged?
How are Built-in AI and In-app AI charged?
Built-in AI includes AI features available directly in Teable, such as AI Field generation, AI Chat, IM Bot, and App Builder. These features currently use credits at a significantly discounted rate.In-app AI refers to AI features used inside apps created with App Builder. Usage is charged at the selected model provider’s official API price, with no markup or discount. US$1 of API usage equals 100 credits.
How do I roll back to a previous version?
How do I roll back to a previous version?
Click the History (clock icon) button to view deployed versions, then restore the live app to a previous stable version.
Why does App Builder say an Agent is busy in another conversation?
Why does App Builder say an Agent is busy in another conversation?
Each user can run up to 3 Agents at the same time, including AI Chat and App Builder. If App Builder says an Agent is busy in another conversation, another task is still running. Wait for the previous task to finish before continuing.
How are credits refunded when an App Builder run fails?
How are credits refunded when an App Builder run fails?
One App Builder run can include multiple processing steps. The conversation and billing page both show the total credits for that run. Work that Cuppy already completed and saved can still be used. If the final step is interrupted by an unexpected error, credits for that interrupted step are refunded automatically. You can continue working in the same app conversation.
Where do I configure App Builder for Self-Hosted?
Where do I configure App Builder for Self-Hosted?
If you are running Teable self-hosted, follow the setup on the AI Settings page. If App Builder uses your own key (BYOK), the chat model must come from an OpenAI Compatible or Anthropic provider. For deployment support, contact Teable at support@teable.ai.
If you select Vercel under Deployment Engine, make sure both your Teable instance and object storage (MinIO / S3) are publicly accessible, then use Test Public Access on the AI Settings page. This check is not required when you select Teable Infra.